
Friday, December 14, 2012
Saturday, December 1, 2012
A day of sketching in Philadelphia
I took an extra day in Philly to wander and sketch. Great city. I had a nice time. Patrick Stinger and his wife gave me a general layout of things to sketch. I roughly followed their direction. I started in the Italian Market with a great cup of coffee and salami as I found a stoop to sketch from. I got to have a lot of conversations with kids.


This sketch was actually the first stop, if only because we spent the previous evening at the Pope's Pub and I wanted to get a sketch. The first one was from the car. The second was from a photograph later in the airport while I could still remember it.


This sketch was actually the first stop, if only because we spent the previous evening at the Pope's Pub and I wanted to get a sketch. The first one was from the car. The second was from a photograph later in the airport while I could still remember it.

The last stop after wandering randomly around the city was the Barnes Museum. Really beautiful building, but I had a hard time getting a painting I was happy with. I was determined to go abstract without lifework. However, that didn't seem to be in the cards so I did as best I could and loosely sketched over it.


Got to the airport at 4pm. finished the second Pope's Pub sketch and finished off a great day.
Wednesday, November 21, 2012
Altoids paint kit 3 "The brush"
It took forever to find this little brush, but Liz at Wet Paint came through for me. And now they carry them! Thanks!
"Koi water brush". I don't really see a model but the numbers "xqr" and the numbers 38552 and 4ml large are on the pack. These come in three sizes but I have only played with the medium.
I love it and Perfect for what they do and the size, but my critique is they are a lot harder to squeeze and don't have the water control of the larger sizes. Easy trade off for portability, but planned sketch day would benefit from the larger brushes. The water cartridge travels really well, but be warned it doesn't hold a ton.
Now with my Altoid kit and a rubber band holding a paper towel I have had a blast being able to paint with (almost) as much portability as a pencil (almost, but certainly more colorful)
A weekends worth of sketching
Nothing special about the weekend except I really felt like sketching and had my small kit with me.
 A quick sketch at Sporty's Bar (A dive bar of epic proportion in a good way) waiting for a friend to show up. Given this was done in poor lighting I think it came out ok. Mostly practicing people and watercolor with a prelim sketch.

Before church drawing my son in the Westminster Library and people in the coffee shop. My people are actually starting to look like the people.
 In the NE Coffee Shop we all three went hung out for a while and I did a rough abstract of the flowers at the table.

 Later that day, painting while Leo played in the park. Once again, trying to draw more with paint, although I did do a light sketch of the major parts and proportions. I simply ran out of time on this one. It was fun and I have decided for an architect, I don't sketch enough houses and buildings.


Before church drawing my son in the Westminster Library and people in the coffee shop. My people are actually starting to look like the people.

Monday, November 12, 2012
Altoids paint kit part 2
Part two,... I realized I didn't show the actual kit itself. Plus proving it is so simple a 4 year old really enjoys it!


Friday, November 2, 2012
Practicing faces and figures
Triple duty here. Practicing faces based on a proportional study I found. Making use if the Anthropology magazine we get (and do store drawings for). Plus, getting used to my pentel pocket brush. 


Monday, October 29, 2012
"Altoid" portable water color tin process

A road test tray and 3 news ones

A cold but perfect morning. Waking up before the sun on a Men's retreat to paint and think.
I have been on a journey to create my version of the perfect pocket tin water color set. I have really enjoyed the journey and thought I would share it.
I admit I have really enjoyed researching what others have done. I want to give credit where credit is due and admit that like any good blues song I have blatantly stole, combined, riffed on, maybe added something.... The ranges go from not painting the tin and rubber cementing trays and half trays, to using sculpey clay, to very elaborate. I didn't mean for my process to go the involved route, but hey, when you are having fun and find you can make exactly what you are looking for.....
I have always used a half pan Winsor & Newton Cotman Watercolor - Compact Set and I have always done the urban sketchers type of on site painting. My wife taught me to paint in Rome while there during architecture school and I have used this kit ever since.

Iphone process photo from the Metro Sketchers outing at the state fair this year. Yes that is the arts building. (perhaps one day I will have something in there?)
There are things I love about this kit. Including the memories with using it. But I wish it was smaller and honestly, since I didn't create the color palate, I didn't really know how to use most of the color. I have been on a concurrent crusade to understand color while making this kit and the color choices used in the tins will reflect that, but more on color later. But honestly, this cost me 30 or so bucks in 1998 and I have sooo enjoyed it and still will.
On to the making
The Tins
Like I said, I did a lot of thinking first and a lot of research. I decided I wanted the following:
1. I wanted to go the sculpey clay route (moldable clay you bake for 30 min - pretty cheap - about 7 bucks worth made about 4 trays for me)
2. I wanted to paint the tins so I didn't deal with rust and I wanted a white mixing backdrop.
3. I wanted to steal an idea I saw using bathroom caulk to make mixing trays on the lid.
4. I wanted to make one large tin and one small tin.
And during the process this is where it clicked....This is when I started to get excited. This is where I answered the question...why not just buy the little KOI kit (that comes with the little water brush I couldn't find and seems like a great kit.)
5. Once I started making the sculpey trays I decided I would enjoy being able to take them out and use both surfaces of the tin to mix with.
Then I realized I could reasonably stack two trays in one tin.
Now we are making something we can't buy...I am in....
Then I realized I could reasonably stack two trays in one tin.
Now we are making something we can't buy...I am in....

THE TINS
Altoids have become the household name for these tins, BUT they started embossing the logo into the lid. So I found a Newman's own brand that had a flat top. I bought a large and a small. I have played with these for hours, but still haven't gotten through all of the mints!

To Start
Prepping the Tins. Following other's advice I :
1. Thoroughly washed the tins
2. Bought some (Walmart) white appliance paint
3. Heated the tins up to 200 or so degrees
4. Put them in a shoe box
5. And spray painted the crap out of them. I was surprised that even with doing multiple small coats the original color still sneaked through. The lesson here is to use more paint than you think you need.
The Clay
I bought the super premo white sculpey from Dick Blick. I bought two small packs and it was enough plus a little to do everything you see here. My sculpting is rough, but I love the experimental phase. I learned a little about warping too, but more on that toward the middle of the process.
I started thinking I would use the entire bottom of the tray. I used the half pans from my cotman kit as a starting point.


Then I realized half the tin was all that I needed and I would still have space for my brushes and pencil. In the beginning I was going for tight fit, but removable for cleaning. Now I go for ease of taking in and out of the tin.
At this point I had decided to cut the tin in half. Next I started cutting in the half trays from my kit. I decided not to use the trays. I just use them for the shape and then fill with tube paint. I dries well enough to travel within a couple of hours. Hasn't been a problem, and this first kit even survived me dumping a Kayak with this kit in my pocket.

On the lid and the small tin I used the caulk trick to separate mixing trays and make the paint wells on the smaller tin. I used a regular full size caulk gun. This was much more difficult to make even close to pretty and I had to form it with a paint knife quite a bit. I think a smaller tube of caulk would make this much easier. Going though old car model stuff lately I found a putty they use to build stuff up. This tube I have is over 20 years old, but I think I will see if it is still good on the next round.

The finished and baked tray. Notice how thick the sides are? This one did not warp. My later ones were smaller and did warp a bit. The warping is fine except it makes is thicker for no good reason so closing the lid becomes hard now. Symmetry about the sides is the key.

The finished tray - both "large" and small.


Now to load them up with color. Inspiration to me Cathy Johnson has a wonderful blog, and information specifically about this. She was smarter and took the simpler approach, but she does talk alot about limited color choices and I used that model. She has two approaches and they are both represented here.
NOW TO TEST DRIVE.

Test drive at home....

Test drive in the field


And test drive at the kitchen table (My Inlaws in Bella Vista Arkansas doing a study of an amazing national steel guitar)

At the coffee shop (Mauve's in NE Minneapolis)

So...As I said, now I am making something I can't buy....AND I HAVE CLAY LEFT OVER....and I have played with it awhile.

I have thought alot about mixing space and in a small working area how to keep you colors clean. I have been thinking about sloped paint wells where the pure stuff stays up top, and you can play with color mixtures down below. I had a couple of ideas and roughed them out. I started the same way as before, using the half pan from my cotman kit to space things out, but started carving from there.
progress shots.....


This tray has a single slope

This tray has a double slope


After baking the first two warped a little. I wasn't careful about keeping a consistent edge

After baking


...So on the third one I added a small skillet during cooking to make
it flat. I underestimated the weight and the heat, but it is still
usable and has this cool impression on the back...but it is a bit
squished...BUT STILL USABLE!


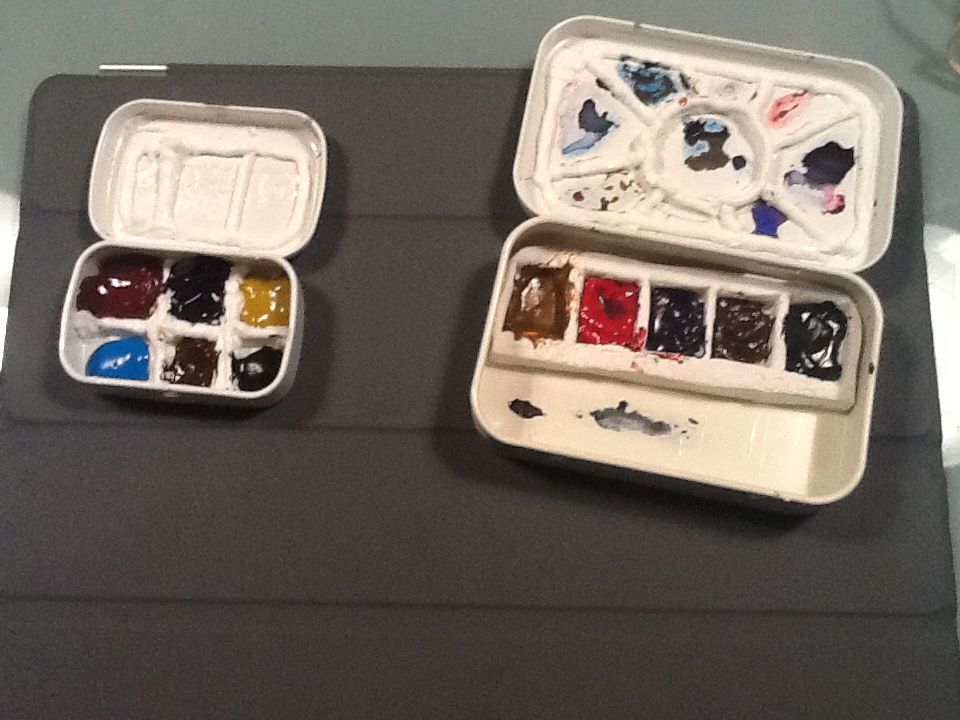
My new arsenal

I have only test driven these in at my table so far

I have loaded these up based on distinctions made in "Making color sing" seperated by transparents, vivid staining, and very opaque. For now this is working for me and I use a sharpie to give the same abbeviations for the studies. I know that I will change this arrangement later on with a little soap and hot water...
This blog entry is long enough. I want to talk about color choices and the pen brushes on later post.
I hope this helps and maybe I have added to the great conversation. I am certainly enjoying my custom kit.
Subscribe to:
Posts (Atom)